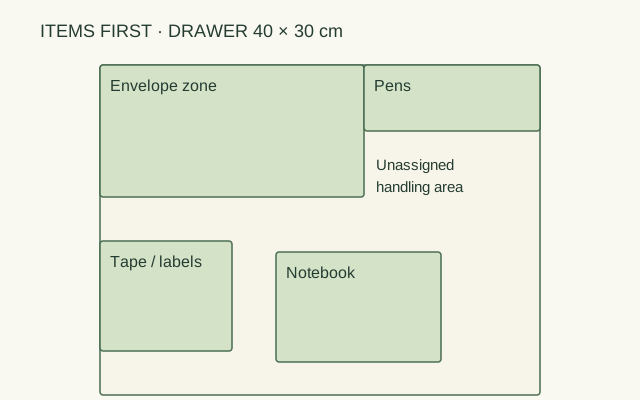
An empty divided drawer makes every compartment look useful. The problem appears when a real object is longer than a compartment or the dividers take the space reserved for a small stack. Start with the items and their removal paths. Only then decide which boundaries are useful.
This method works for everyday stationery and accessories whose shapes can be represented on paper. It is a layout exercise, not guidance for storing sharp tools or hazardous materials. Measure the clear drawer interior at its narrowest points and note any corners, runners or screws that project into it.
Create a footprint inventory
Lay the intended contents on a table in the groups you actually retrieve. Measure each group's occupied width and depth in its normal stored position. A packet of pens can be one group; three individual pens need not become three separate cells. Add a note about how the object is picked up, because a tight outline may leave no room for fingers.
| Illustrative group | Footprint | Access note |
|---|---|---|
| Long envelopes | 23 × 11 cm | Grip the short edge |
| Pen bundle | 16 × 6 cm | Lift from the middle |
| Tape and labels | 12 × 10 cm | Take the entire tray |
| Small notebook | 15 × 10 cm | Leave a finger opening |
For a hypothetical 40 × 30 cm drawer, draw a rectangle at 1:5 scale: 8 × 6 cm on paper. Draw the envelope rectangle as 4.6 × 2.2 cm at the same scale. Keep that ratio for every item; a sketch where the notebook is drawn arbitrarily small cannot verify the plan.
Compare a loose plan with a rigid grid
Two long lanes may work better than many equal cells. Put envelopes in a 24 × 12 cm zone along the back, pens beside them, and a movable tray near the front. Mark the remaining area before choosing more organizers. An unassigned strip may be useful handling room rather than wasted space.
By contrast, four dividers each 0.5 cm thick consume 2 cm of a 40 cm width before any contents are placed. A plan that allocates all 40 cm to objects and adds dividers afterward cannot fit. Include wall thickness and the outside dimensions of trays, not just their advertised internal compartments.
Trial the opening movement
Use paper rectangles or temporary boxes and open the drawer through its normal range. Retrieve the longest item without lifting a neighboring stack. Put it back without rearranging the whole drawer. A layout that fits closed but prevents removal has failed the trial.
Keep a simple record: interior, divider thickness, group footprints, handling gaps and what changed after the trial. If the contents change frequently, fewer movable divisions may be easier to maintain than a perfectly filled custom grid. The goal is a drawer you can use and reset, not maximum compartment count.
ORIGINAL REFERENCE DIAGRAM